• This forum is the machine-generated translation of www.cad3d.it/forum1 - the Italian design community. Several terms are not translated correctly.

creation inserts/spine creo 7

  • Thread starter Thread starter creo_enjoy
  • Start date Start date

creo_enjoy

Guest
Good morning, in the company we are using creo parametric 7 to make the molds.

we are taking some confidence with the program but we can't do an operation that is indispensable for the molds, the creation of thorns or anyway inserts on the printer parts.

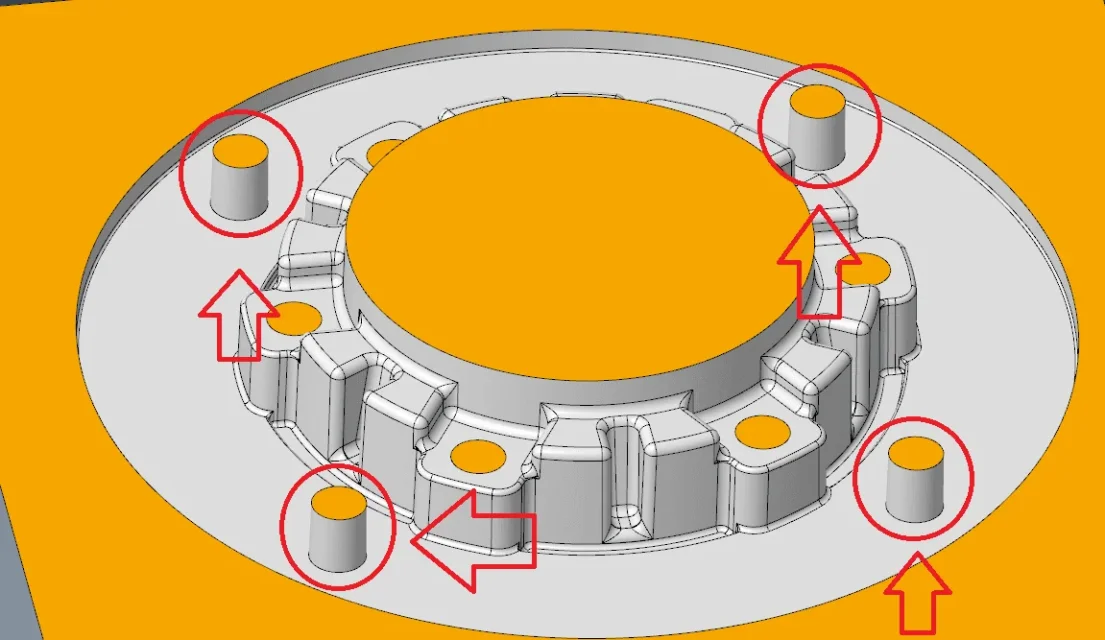
As you see from img attached, I should "remit" the 4 parts circled in red, so that they are components to themselves.

How can I do that?

Thank you.
 

Attachments

  • Immagine.webp
    Immagine.webp
    70.1 KB · Views: 17
good morning from the image you do not understand if the parts in red are prts or features. both for components and features you can use the pattern (series). has different execution modes that guarantee maximum flexibility.
 
Thanks for the answer gorea.

What you see in img is a matrix, a single solid. I would need to make the four parts of the parts to itself.

So I should finally have 5 solids, the matrix + the 4 thorns.

Thank you.
 
depends on several reasons .. if you want to use that as a prototype and then you want to create the individual prts, you can do it using the feature copy geometry. or there is the library of screws and thorns that also generates the seat with the positioning; the module is called creo intelligent fastener (ifx).
 
Thanks for the answer.

I find myself in the situation where I have a form and I have to get other solids from that form, so the speech of the copy geometry could come less if it has different geometries (if I understood well what you mean with copy geometry).
To tell you, I could also have a matrix with four different thorns, I would care to understand the way even if I had a single part to put back.

to make you understand what I mean in the other cad that I use to put a plug I make a concentric circle to the plug, function cut and keep both parts, so I will have the matrix with the hole with inside the plug.

Thank you very much
Good day
 
I watched the video but honestly I don't understand if the 4 cylinders that are placed in contact with the 3d model are thorns or extractors.

I would need to create thorns as you see from img attached.

I might be able to deal with thorns as extractors, but I would be in trouble when I have to put back non-cylindrical parts or complex parts.

Thank you.
 

Attachments

  • spina.webp
    spina.webp
    78.9 KB · Views: 12
emx has a cost, so they are not standard features. the function cuts and keeps in creo does not exist (what other cad uses?). copy geom allows you to create the objects you have indicated and in the appropriate position but to explain it is not so immediate. I don't think of other solutions.
 
hi in my work I use the package tool to create divisions parts of the mold.. If I had not thought I would create in the matrix part a public geometry feature with the solid of the matrices and the division surfaces of the thorns and use copy geometry referring to the public geometry of the matrix in the new spin part. I would cut with the split surfaces both parts in the desired direction
 
hi in my work I use the package tool to create divisions parts of the mold.. If I had not thought I would create in the matrix part a public geometry feature with the solid of the matrices and the division surfaces of the thorns and use copy geometry referring to the public geometry of the matrix in the new spin part. I would cut with the split surfaces both parts in the desired direction
Thanks for the answer... we have the tool package of the molds, can you explain how to proceed for the creation of the plug? Thank you.
 
Thanks for the answer... we have the tool package of the molds, can you explain how to proceed for the creation of the plug? Thank you.
provided that I do not use the space of the package tool here are the steps I follow:
1 creo component mold (green in the image) in which I create all surfaces of division thorns (saw and possibly heads)
2 I create volume division (red in the image focus on the correct icon) from the volume of the matrix assigning the name to the volume plug
3 I create cavity insert with which I create the *.prt part of the plug (the same volume name) assigning a standard part mask (yellow in the image)Cattura.webp
 
provided that I do not use the space of the package tool here are the steps I follow:
1 creo component mold (green in the image) in which I create all surfaces of division thorns (saw and possibly heads)
2 I create volume division (red in the image focus on the correct icon) from the volume of the matrix assigning the name to the volume plug
3 I create cavity insert with which I create the *.prt part of the plug (the same volume name) assigning a standard part mask (yellow in the image)View attachment 61386
Thanks for the explanation, in the afternoon I try and let you know!

Thank you very much
 
provided that I do not use the space of the package tool here are the steps I follow:
1 creo component mold (green in the image) in which I create all surfaces of division thorns (saw and possibly heads)
2 I create volume division (red in the image focus on the correct icon) from the volume of the matrix assigning the name to the volume plug
3 I create cavity insert with which I create the *.prt part of the plug (the same volume name) assigning a standard part mask (yellow in the image)View attachment 61386
I've tried, but then you've got all the thorns you need to put back? in the sense that you do the surfaces with which you will then create the solid?

because as long as it is a cylindrical and simple plug it may be, but if for example I have to put a shaped dowel and with strange geometry? How could I do that?
 
I didn't have the mold module but with
copy geometry
I created dowels / thorns etc etc. using the surface of the piece (which you will have previously scaled to take into account the withdrawal )
view video examples on you tube
Hi.
 
I didn't have the mold module but with
copy geometry
I created dowels / thorns etc etc. using the surface of the piece (which you will have previously scaled to take into account the withdrawal )
view video examples on you tube
Hi.
Thanks for the answer.

I tried to watch some videos from you tube. practically, from what I understand, copy geometry feature consists in copying faces, correct?
then will the copied surfaces use them as a cutting tool?

Do you have an example to link me from you tube?

Thank you.
 
I've tried, but then you've got all the thorns you need to put back? in the sense that you do the surfaces with which you will then create the solid?

because as long as it is a cylindrical and simple plug it may be, but if for example I have to put a shaped dowel and with strange geometry? How could I do that?
but it is the package tool that does everything. I'm not doing anything. starts from a solid block that is 1 of the 2 inserts. you create the surfaces of division/cut of that solid that can be complex thorns-cuts passing or not passing and is the system then that extracts the dowel and creates the seat in the starting block
 

Forum statistics

Threads
44,997
Messages
339,767
Members
4
Latest member
ibt

Members online

No members online now.
Back
Top