• This forum is the machine-generated translation of www.cad3d.it/forum1 - the Italian design community. Several terms are not translated correctly.

forometrics in brick walls

  • Thread starter Thread starter Mone89
  • Start date Start date

Mone89

Guest
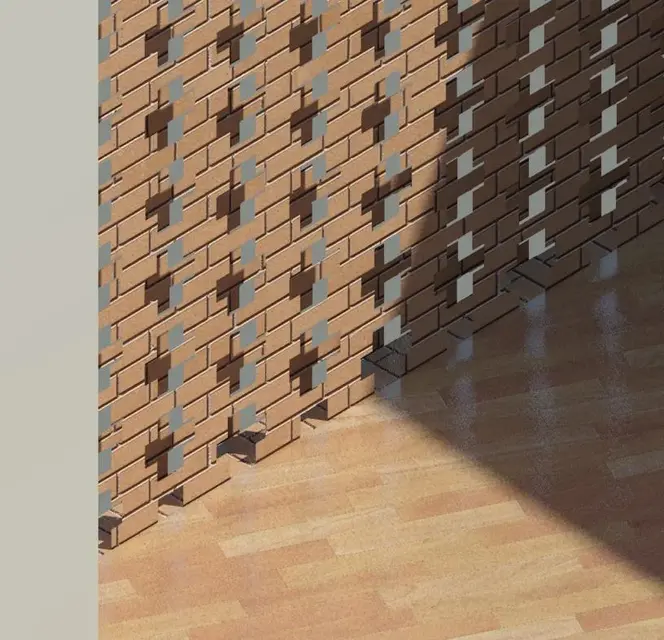
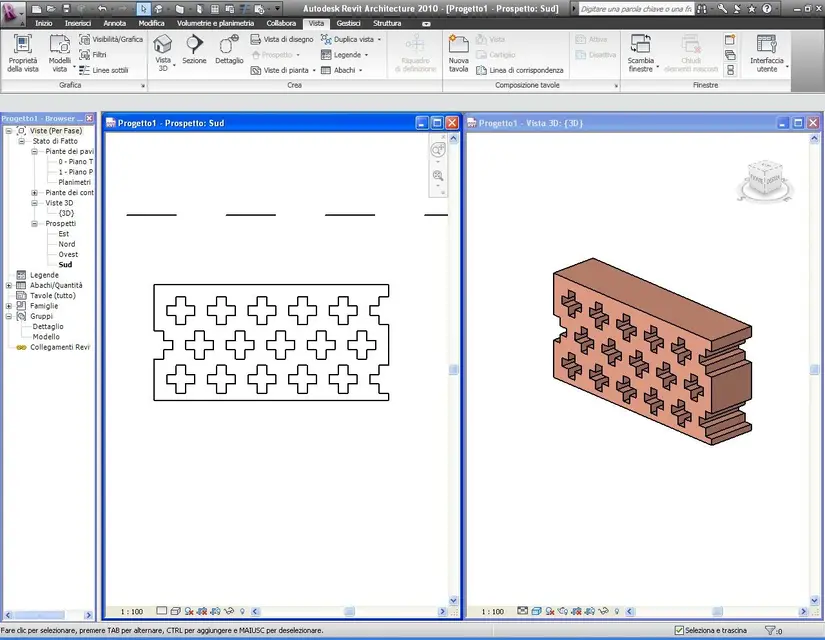
hello to all, once again ask your help. I have to perform a brick wall with a cross forometry.. (they are the old walls of the stables) unfortunately if I use a "generic" base and insert the images of the brick and insert the image of the forometry, he is the size but treats the wall as if it were hollow inside and therefore between the internal and external facade there is no concruency in the holes, moreover I noticed that inside the cavity you notice this internal vacuum. How can I do to make sure you treat it as a thick element like steel and drill it properly?
I attach a render that emphasizes the incongurence and the "internal vacuum"
 

Attachments

  • {3D}.webp
    {3D}.webp
    91.7 KB · Views: 63
forometrics, must have a correct "report" with the size of the bricks.
If, for example, use 12x12x24 bricks, the holes devour 12 step heights and 12/24 pitch widths.
Therefore, using an image that has such an forometry (the photo of the wall is good) and aligning it with its function from the properties of the material, the holes will coincide
The problem isn't in aligning the brick holes... holes were created on the basis of an image of revit with cross bricks + dark... I am not able to align the holes, and cmq even if I can, the wall is empty inside, so if I prone the 3d view you see that it is all empty and does not have the effect of a wall
 
... because you do not use a default wall (wall family), with holes performed by a family of "empty" on a wall host (parametric magari). .
 
... because you do not use a default wall (wall family), with holes performed by a family of "empty" on a wall host (parametric magari). .
the problem always remains to align the brick plot with the holes... since the plot alignment command I can never click it :frown:
 
... because you do not use a default wall (wall family), with holes performed by a family of "empty" on a wall host (parametric magari). .
I tried to create a wall from the families the hole added the material but once the amount doesn't even display it to me
 
I tried to create a wall from the families the hole added the material but once the amount doesn't even display it to me
... you will have created forometrics: It is not possible to create "a wall from families" but to import it (in the project), I already have it ....
 
... you will have created forometrics: It is not possible to create "a wall from families" but to import it (in the project), I already have it ....
So what do I do? Do I have to stay there in place to pierce my wall with the empty? is also well done with the material, unfortunately I do not know why it turns the wall into a hollow element covered... revit 2010 is not unable to pierce a wall holding its thickness by using the material?? it would be easier if the material used (not only steel) e.g. bricks could be drilled. I know that you may not care but be replicating an entire wall as this in photo is complex.
 

Attachments

  • Senza titolo-1.webp
    Senza titolo-1.webp
    125.9 KB · Views: 33
the wall, in the project, as it was designed: using a family of walls or a mass/solid?

If you tell me that creating holes you see the wall "head" you did not use a family of walls.
first draws the wall using families (system) by: start>muro> ....

then, creates a family of vacuum, through: new > household generic model based on wall. .
creates the vacuum (parameter) .... with the real dimensions of the hole (cross) and before closing the family uses the command size geometry.
save the family by name and import it into the project.
place it in the wall.
if the vacuum family is parametric (with matrix parameter) changes the hole number (as x and y), if it is not parametric, copy it with the matrix command... .

assigns a new material to the wall material, in which you replaced the texture (the image file) with the "real" one.
the image "real" must be in practice a photograph, taken orthogonally to the "side" of the wall, which includes at least 9 holes (3 x 3 ).
dimension and align the new image in the material (material properties).

if you want to use the material "forced" already present in the revit archive, you must make sure that the size of the holes is "protional" to the size of the "maton" present in the material, that is:
- print the material, measure the size of the holes with those of the bricks;
- draws the holes, with "real" measurements;
- adapts the texture size so that it meets the size of the holes/mattons.

the above to obtain real "effects" in rendering.

if instead you have to make colored "tables", for the design uses the appropriate "retini", to be placed on the surface of the wall, to get a "simil" view with holes, and to make the rendering uses the material already present in the archive... .
you have no problem adjusting holes (which do not exist) with those of rendering material
in such case the light effect that passes in the voids will not be present ...

I attach the hole family (not parametric) as an example
 

Attachments

I also attach an example of the wall.
the forometry, of course, must have the dimensions of the real one, to adapt to the texture of the material ....
as you see, inside the wall is not hollow
 

Attachments

  • Fori.webp
    Fori.webp
    94.3 KB · Views: 63
Look if it consoles you this is an example made by a very good collaborator who left us... to make the mother full-time and nn wants more to know about revit and various things. I can only tell you that he had worked with the local masses, at least so he told me. courage, courage colleague, that in the end the holes you will be able to do them.
Good Sunday to all the Revittians!:finger:
 

Attachments

  • mattone_1.webp
    mattone_1.webp
    50.3 KB · Views: 45
  • mattone 2.webp
    mattone 2.webp
    167.7 KB · Views: 35
Good job:
Can you explain how you solved it?? :mixed:
I apologize for the late answer, but I had not been notified of this post -. -
Anyway I followed what gfrank told me, I ran a hole (not parametric) and put it in the wall I needed.. I preferred not to perform it parametric and copy and paste the forometrics personally, because I could handle them much better, since in some points they had not to be there. regarding the coating I took an existing revit that has bricks with brick crosses + dark... with photoshop I deleted the dark crosses, and ik game is made.. ah for the forometrics I took the size of the texture bricks so that they were accurate.
 

Forum statistics

Threads
44,997
Messages
339,767
Members
4
Latest member
ibt

Members online

No members online now.
Back
Top