• This forum is the machine-generated translation of www.cad3d.it/forum1 - the Italian design community. Several terms are not translated correctly.

render to print_setting

  • Thread starter Thread starter SalvoP87
  • Start date Start date

SalvoP87

Guest
hello to everyone, they'd still miss touches on the project but I'm already beginning to see to create the render.
practically I should insert the pictures in the prints that I will have to present to prof.

the problem that the render does not satisfy me very much, is in detail and ungrateful.
I place a couple of pictures, some made with screen mode and some with printer (300dpi). with the screen mode comes out too loose, while if I want to make a render of the whole lot with the 300 dpi printer mode I would get an image of almost 1gb, which is absurd. I didn't get something like that.

Can you tell me if there are any particular settings to change? the renders I will have to get are external views and assonometric splits.

Thank you all.

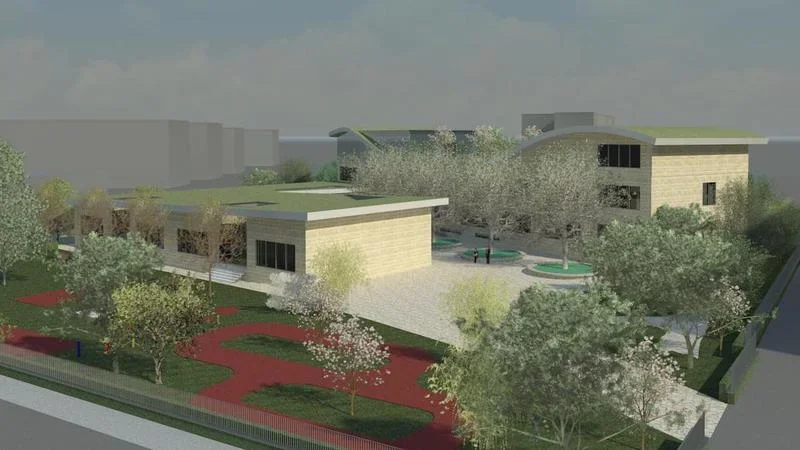
1. external view lot, screen mode. 85kb:/
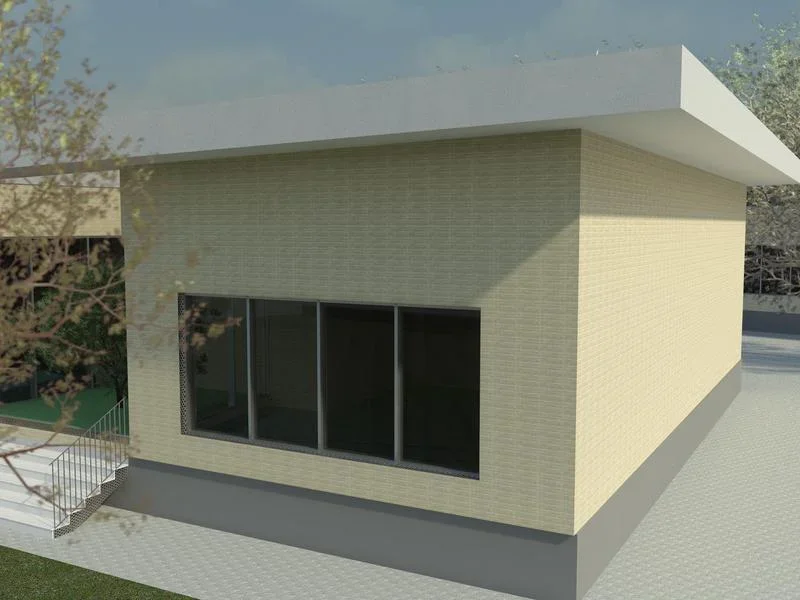
004.webp2. camera view, screen mode. 27 kb:p
003.webp3. camera view (like above), 300dpi printer mode
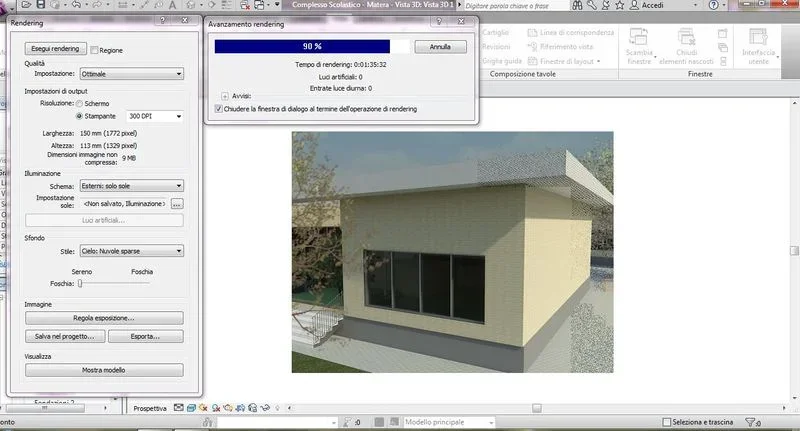
002.webpthe settings are these, but it is not possible that 90% has passed an hour and a half.
I think the problem could be textures, they're too small and so it increases the time to make. the strips should be more double, like the pavement floor which looks like a tiny little wreath when in the end they are 15 cm bricks. How do you enlarge the texture of a material?
001.webp
 
Last edited by a moderator:
let the presets stand out are general settings from which to start but then you have to put your parameters in a more timely manner.
Customize as setting click on change, copy media quality settings and parts from them. do localized tests on some parts of the model when you are satisfied throw a general test.
are external renderings so for example you can set a lower indirect lighting bounce value, indirect lighting is one of the parameters that most affects calculation times.
with regard to the textures should be mapped. click on the image within the material editor, in the panel that opens you can correctly size the texture.

Passionate advice you lose some time to understand how the materials work and edit them, look for new textures for example, those defaults are not a great deal with new materials made well the yield improves a lot.

first, however, the lighting should be well studied with a neutral material. I usually use temporarily replace the materials of the phases and apply to all a dirty white so that I can study well shadows etc. then when I am soddifa reactive materials and study the final rendering.
 
thank you for the advice...however a question, why should I start from an average quality? I can't start from the optimal one, so that I decrease the value of indirect lighting bounces and the rest the ups or remain unchanged so that the rendering goes well.

Anyway, don't get him out of print, do I want to print 300 dpi?
 
However, this is a vision of framing. What do you think? How could I improve it?
I made it in optimal quality, 150 dpi printer mode
 

Attachments

  • vista3d5.webp
    vista3d5.webp
    51.4 KB · Views: 21
Last edited by a moderator:
starting from average quality allows you to balance calculation times with rendering quality. the final image is usually the result of countless tests, if you do them all from the optimal quality you lose only a lot of time.
the process therefore is the opposite from low to high and only for the parameters they serve.
Anyway, don't get him out of print, do I want to print 300 dpi?
the correct question would be what resolution and good to use to print a x-size image for y. 300 dpi (which then would be ppi) means that you are rendering an image defined by 300 pixels per inch, too for a yard sign, too little for a catalog.if you look next to the width and height values shows you an express value in pixels.

for example 3500 x 2500 allows you to print with a pixel density of 300 dpi an image of 29 cm x 21 cm in practice an a4.
on the basis of mia experience I can tell you that a value of 300 dpi is often too high and that there is one can handle even less. even because contrary to what is believed an excess of information is not always productive.

also consider the support you want to print on. if you print on photo paper with special inks then it is worth sacrificing time for calculating an image with good resolution. if you print with a plotter on common paper with traditional inks you can safely go down with quality. so much will be a serious problem getting correspondence between the colors to video and those on paper.
 
However, this is a vision of framing. What do you think? How could I improve it?
I made it in optimal quality, 150 dpi printer modevista3d5.webp
The textures of the floor and the masonry do not go well you can see too much repetition.
the material (or the method of calculation of the lighting) of the windows is not good the black inside is unguardable,
outside sidewalks have no thickness.
Is the fence muretto a hedge?
the frame crushes the image a bit.
You could give a slightly more defined color to the masses of buildings around.

etc.

do not offend you but there is a lot to work on:finger:
 
Last edited by a moderator:
@ savep87
I remember that the images must be inserted with the button "go to the advanced mode " and then "manage attachments"
 
The textures of the floor and the masonry do not go well you can see too much repetition.
the material (or the method of calculation of the lighting) of the windows is not good the black inside is unguardable,
outside sidewalks have no thickness.
Is the fence muretto a hedge?
the frame crushes the image a bit.
You could give a slightly more defined color to the masses of buildings around.

etc.

do not offend you but there is a lot to work on:finger:
I am not offended, but I am constructive criticism to improve. This is my first job in revit so I have to perfect a lot. As for the windows I do not understand how I set the material to avoid that year black effect, I simply left the material of the glaze.
regarding the masonry and the floor in what sense is repetitiveness? How should you see yourself?
for the fence wall something I modified but still there is also the nearby hedge.
how do you give a color to the masses?

I'm sorry but I'm at first so many things I don't know, the book I bought treats little to make.


However I wanted to ask if it was possible to insert a camera from above and make a render for planimetry, then I would like to insert a camera to see the split. because if I try to render without sight it increases my time to realize an image (for a split it took 3:20 hours), while with the camera then you can dimensional the picture pane and then decrease the time
 
As for windows I do not understand how I set the material to avoid that year black effect
check the rendering settings of the material and maybe try to replace it with another..... also review the refractive settings in the rendering calculation parameters.
regarding the masonry and the floor in what sense is repetitiveness?
in the sense that it is understood that it is the same texture flanked many times. But it could also go. . .

for the fence wall something I modified but still there is also the nearby hedge.
Well, at the entrance it seems that the wall piss The hedge... try to detach it a bit or insert motion when you pull it.. .

select the mass (or a face)> dynamic modification, select again the mass (or its part) and in the property panel where there is material clicks in the value field and the checks.
However I wanted to ask if it was possible to insert a camera from above and make a render for planimetry.
from a 3d view through the viewcube imposed display from above.
then I would like to insert a camera to see the split
creates the view of camera and then activate the section pane.
 

Forum statistics

Threads
44,997
Messages
339,767
Members
4
Latest member
ibt

Members online

No members online now.
Back
Top