• This forum is the machine-generated translation of www.cad3d.it/forum1 - the Italian design community. Several terms are not translated correctly.

3d

  • Thread starter Thread starter zetadierre
  • Start date Start date

zetadierre

Guest
Here we are, I start this adventure. I opened this thread because I would like those who like me to learn from an experience of someone who has passed before, to do so.

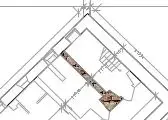
I have the correctly imported plant in scale of one block with so much altitudes. the itching consists of two buildings placed v used as a prison until 1848. the total height of these buildings is 16 and a half meters. the plans of this "panopticon" are 4, but it is not said that the same plans will remain in the project

we have to create a library, but I wanted to start from a model prexistence and then work on it and away make with artlantis with the excellent update command to render.

first step: how to set the levels?

in the sense: in view of
1)Having a 3d model from which to have a display of plants without creating other only two-dimensional levels

2) obtain sections

3) being able to obtain an update

is it better to immediately set layers for layers with the various odds or create everything on a single layer?

Thank you.
 
There's already a problem... Trying to realize the layers with set model I can't hook the previously imported two-dimensional level to realize the walls even if the "modification" setting is activated on the management of the lights... mmmh...
 
There's already a problem... Trying to realize the layers with set model I can't hook the previously imported two-dimensional level to realize the walls even if the "modification" setting is activated on the management of the lights... mmmh...
fixed: different scales :36_1_25:
 
the 3d model is organized according to the type of project.
In your case you probably need to develop it on multiple layers, each with its z and delta z. This way you can work on different floors without interference with others and get 2d view separately. with stack view command (2009) or unified view (2010), however the icon finds it on the top-right date bar, rotates the model as if it were all on a single layer.

the sections you get with the created section viewport command (I am sorry but I do not know the equivalent in Italian!). but if you use the workspace editor you can also find the commands to obtain sections 2d and 3d (here are cut 2d section/3d section).

if you set the viewports with a rendering this is updated with the appropriate button on the info stand (update viewport)

However, the subdivision of the plans on different layers does not bind you in case you decide in a second time to change the internal subdivision of the plans.
Hi.
I do.
 
Well, I set my levels this way
url]
and therefore results
url]
1) What do I do with a loft layer and a flat layer?? and then: the loft layer 0 refers to the floor trampled by plan 0?

2) I am creating walls and windows of which I attach a first, horrible:biggrin:, render
url]
the elements in orange are polygons extruded under the same layer of the walls, and they are those that are giving me problems, because I can not put a texture like in the walls (in fact I would only need to see solid or shaded the model when it is in 3d and that only see the lines when it is in the plant). in addition those two elements in the plant are two detached elements and I would like to see them as one element so as not to have problems in the plant

(see prox mex)
 
is it possible to create a particular section wall? ? ?
 

Attachments

  • connessione no.webp
    connessione no.webp
    114.6 KB · Views: 9
now that I understand the method I attach pictures of the previous message
 

Attachments

  • LayerA.webp
    LayerA.webp
    26.9 KB · Views: 9
  • LayerB.webp
    LayerB.webp
    48.5 KB · Views: 9
  • primo render.webp
    primo render.webp
    76.3 KB · Views: 22
1) What do I do with a loft layer and a flat layer?? and then: the loft layer 0 refers to the floor trampled by plan 0?
I'd say nothing. I usually have a layer for each floor including its sole, walls and other elements at that altitude.
2) I am creating walls and windows of which I attach a first,
horrible:biggrin:, render
I don't see anything. .
the orange elements are polygons extruded under the same layer of the walls, and they are those that are giving me problems, because I can't put a texture like in the walls
when you need to collect an element to a wall, use the parametric pillars (pillar) that are in the same menu as the soles (at least here in the international). you will see them correctly in the plant.
if polygons don't weave maybe depends on the fact that they have no fill? or do not have 2d polygons from which you left? verify them.
I do.
 
is it possible to create a particular section wall? ? ?
also for this situation use the pillars/pilasters (or however they are called in ita! ;-) in practice the drawings in the plant with the 2d polygon and then, instead of extruding it, call back the command.
I do.
 
now that I understand the method I attach pictures of the previous message
Here's the rendering! :-)
Okay, part of the orange elements you should do with the pillars... of which I find no trace in the manual of vw ita... I hope there are:-\
I do.
 
at the first message I integrated another with the images I couldn't attach, you see them a little lower...

with regard to plates.... I managed to create it but I still can't figure out how to texture it, and then I can't connect it with the wall....
 
I would like to, if possible, always get a solid display in 3d and in plant only lines, if possible... Are you sure you can't see the pictures? I think I've been able to charge them. . .
 
Therefore: if I put in the plant I see the textures in the pillar and not in the walls, in perspective in the walls I see the txt and in the pillar not. I would like to see you collect pillars and walls with lines in the plant and in 3d all with the same solid color. are also of the same category! uff,,,
 

Attachments

  • vista pianta pilasto text.webp
    vista pianta pilasto text.webp
    4.1 KB · Views: 31
  • vista prospettica pi#527D5C.webp
    vista prospettica pi#527D5C.webp
    16.5 KB · Views: 9
Therefore: if I put in the plant I see the textures in the pillar and not in the walls, in perspective in the walls I see the txt and in the pillar not. I would like to see you collect pillars and walls with lines in the plant and in 3d all with the same solid color. are also of the same category! uff,,,
I see the pillar as if it was created with an unclosed polygon. double click above and close the range otherwise it will never do what you want. :-)
 

Attachments

the three images I attached (but I wasn't so sure to succeed) show how to connect the walls to the pillar (in this case a simple square): as you see in the plant are continuous lines. in 3d/wireframe see the individual entities, but in rendering the texture will be continuous.
I do.
 
the three images I attached (but I wasn't so sure to succeed) show how to connect the walls to the pillar (in this case a simple square): as you see in the plant are continuous lines. in 3d/wireframe see the individual entities, but in rendering the texture will be continuous.
I do.
I can't understand.... but what do you give him?
 
I can't understand.... apart from the union of the pillar, with regard to the fillings or I can give it a filling that I also see in the plant or the same effect texture only in 3d that however takes me only on the walls and not on the pillar (as previous image). I don't really know what I'm wrong with.. but certainly a point where I'm wrong
 
I'm sorry about that.

the union of a pillar with a wall happens thus: I create the pillar from an irregular shape, I create a wall straight beginning from a corner of the pillar and the game is made
 
But if I have created windows on a wall, then I gate the wall and rebuild it over another one, how can I reinsert the windows?
 

Forum statistics

Threads
44,997
Messages
339,767
Members
4
Latest member
ibt

Members online

No members online now.
Back
Top