You are using an out of date browser. It may not display this or other websites correctly.
You should upgrade or use an alternative browser.
You should upgrade or use an alternative browser.
volaff
Guest
Good Sunday.
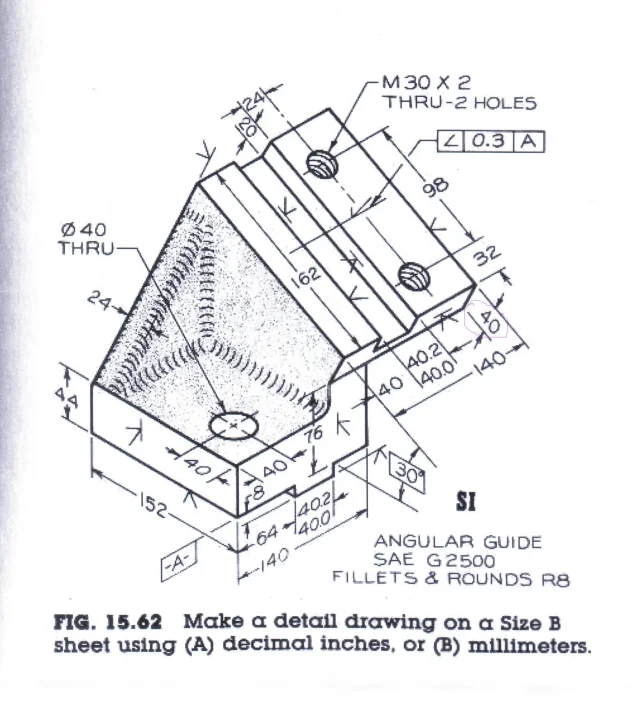
a question: but you in the attached table how would you indicate the quota I looked for in red?
I do not think I must make an additional view but on the two main views the quota is true, different from the one in question.
good continuation and do not eat too much")
a question: but you in the attached table how would you indicate the quota I looked for in red?
I do not think I must make an additional view but on the two main views the quota is true, different from the one in question.
good continuation and do not eat too much
Attachments
MassiVonWeizen
Guest
if the right view from which you get the view to the eye on the other side, then with the hidden rib you can quote the thickness 40 (which takes the eye of a sniper to see the red circle)
volaff
Guest
In practice I have to use a second auxiliary view to put that quota, correct? ♪if the right view from which you get the view to the eye on the other side, then with the hidden rib you can quote the thickness 40 (which takes the eye of a sniper to see the red circle)
MassiVonWeizen
Guest
I don't know how many views it takes to properly quote that piece. If you can't share everything with two, put a third, if there's something missing, put a fourth one, if you realize you could share better with two views and a section throw away the last Mass and do the section... In short, the first times you will do and you will do the tables several times until you have the eye to understand that and how many views you need. and even after years you will rarely understand how to make a drawing because you realize that quotating it in a different way becomes more understandable
I only tell you that to quote that 40 you can use a view already inserted simply by flipping the view
I only tell you that to quote that 40 you can use a view already inserted simply by flipping the view
volaff
Guest
but so doing as quoting ribbing then? Of course I can not share parts not in sight.if the right view from which you get the view to the eye on the other side, then with the hidden rib you can quote the thickness 40 (which takes the eye of a sniper to see the red circle)
MassiVonWeizen
Guest
from a view from above that you seem to have already done
volaff
Guest
You're right!from a view from above that you seem to have already done
I had erased the quota that I had escaped; to quote the rib I suspended the "agreement" function in part environment.
is more understandable if I hold suspended the fitting functions (and then in the 2d do not appear ) and add a note "fillets and rounds r8"? ?
MassiVonWeizen
Guest
probablyis more understandable if I hold suspended the fitting functions (and then in the 2d do not appear ) and add a note "fillets and rounds r8"? ?
volaff
Guest
Hello, everyone.
a question I asked myself.
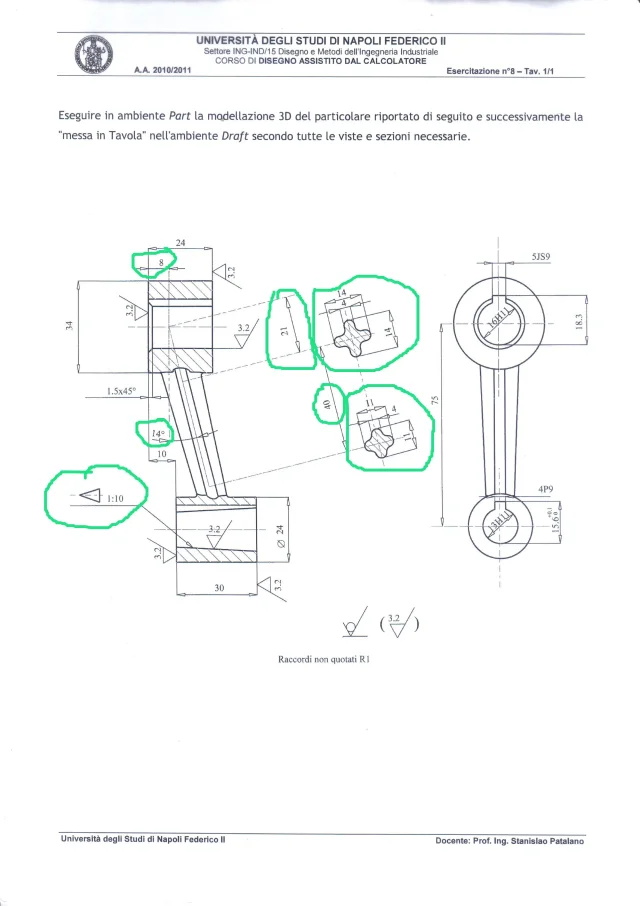
in the case of the part under review, when I go to make the table, how can I do to bring back in the 2d, the diameter of 8 and the circumference of construction (the one from 5) that I used in the 3d? ?
if I use the intelligent quota command in the 2d by selecting the circumference of 8 mi (naturally) the radius as the circumference is not complete, while in the 2d the construction circumference does not appear.
Thank you very much.
a question I asked myself.
in the case of the part under review, when I go to make the table, how can I do to bring back in the 2d, the diameter of 8 and the circumference of construction (the one from 5) that I used in the 3d? ?
if I use the intelligent quota command in the 2d by selecting the circumference of 8 mi (naturally) the radius as the circumference is not complete, while in the 2d the construction circumference does not appear.
Thank you very much.
Attachments
MassiVonWeizen
Guest
Do you ever look at the options and tabs of the commands you use?
once you place the fee and find the card association line where you can choose the type of quotation or right click on the quota, display options and choose quota as diameter
for 5 diameters when you put the centering heels in the voice manual insertion options Choose circular centering notches and you are created the passing circle for the 4 centers
looking at the part:
- the points and the axes you put in the first sketch are useless and the points as they are underdefinite the sketch. in a month you open it and go crazy to understand why it is underdefinite
- the extrusion cut, for a simple passing hole, you could do it in the first sketch or use the creation wizard holes in the case in the future it needed to change type (from normal hole to thread or blade)
Last edited:
volaff
Guest
I actually saw the tutorials of lynda.com and infinteskills: among the options that show these did not explore them.Do you ever look at the options and tabs of the commands you use?
once you place the fee and find the card association line where you can choose the type of quotation or right click on the quota, display options and choose quota as diameter
for 5 diameters when you put the centering heels in the voice manual insertion options Choose circular centering notches and you are created the passing circle for the 4 centers
Thank you so much I understand everything.
Good weekend.
volaff
Guest
Bye.
I realized the 3d of the model in figure.
The only thing I didn't understand is how to create embossed conicality.
also in model 2d how do I bring back the two profiles including I made the loft?
and quotas 21 and 41?
Thank you very much.
I realized the 3d of the model in figure.
The only thing I didn't understand is how to create embossed conicality.
also in model 2d how do I bring back the two profiles including I made the loft?
and quotas 21 and 41?
Thank you very much.
Attachments
marcof
Guest
make a revolution excavation using a line with an inclination of 1:10 (with reference to the diameter of the revolution) then starting from a diameter of 13 on one side and 3mm on 30 on the other therefore diameter 16.Bye.
I realized the 3d of the model in figure.
The only thing I didn't understand is how to create embossed conicality.
volaff
Guest
Sorry but I didn't understand.make a revolution excavation using a line with an inclination of 1:10 (with reference to the diameter of the revolution) then starting from a diameter of 13 on one side and 3mm on 30 on the other therefore diameter 16.
from the definition of conicity, if I did not hurt the accounts the smaller diameter should come of 21.
where d= 16 and l=30.
conicity should be defined as (d-d)/l, then (16-d)/30 = 0.1.
Am I right?
marcof
Guest
in the view on the right of the sheet is indicated diameter 13, and is the smaller diameter of the conical hole. 1:10 conicity means 1 mm of diameter variation every 10 mm of hole length. that hole is 30 mm long then with that conicity the greater diameter will be 3mm more, that is 16 mm.Sorry but I didn't understand.
from the definition of conicity, if I did not hurt the accounts the smaller diameter should come of 21.
where d= 16 and l=30.
conicity should be defined as (d-d)/l, then (16-d)/30 = 0.1.
Am I right?
volaff
Guest
Here we go.in the view on the right of the sheet is indicated diameter 13, and is the smaller diameter of the conical hole. 1:10 conicity means 1 mm of diameter variation every 10 mm of hole length. that hole is 30 mm long then with that conicity the greater diameter will be 3mm more, that is 16 mm.
now should be correct.
Thank you very much.
for table-style sort of the sheet you have suggestions to give me? !
Good evening.
Attachments
volaff
Guest
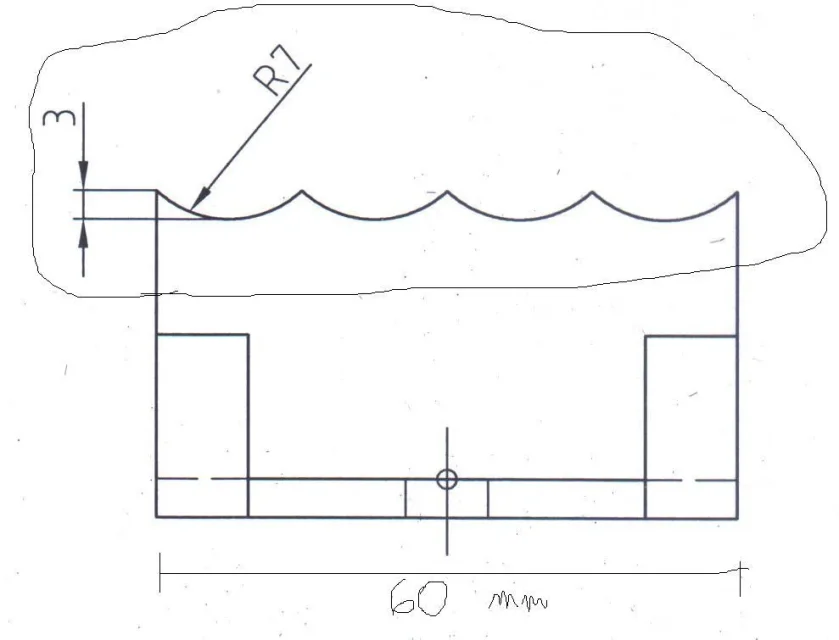
hi to everyone, by curiosity I tried to do a simple thing (that circled in figure).
with the quotas of that beam heel 7 and distance 3 I think it is not possible to have 4 repetitions as from the figure.
You think I'm wrong?
Thank you all.
with the quotas of that beam heel 7 and distance 3 I think it is not possible to have 4 repetitions as from the figure.
You think I'm wrong?
Thank you all.
Attachments
MassiVonWeizen
Guest
Of course not.
to make the width 60 and the 4 sequential arcs coincide, these must have width 15 (60/4), which cannot combaciar and with radius 7; assuming that it has the minimum useful radius, i.e. 7,5, the center would be hilly with the tips and measure 3 would be 7.5.
to have that repeat result the total body size must be 45.95 and broken
volaff
Guest
I'm not stupid.Of course not.
to make the width 60 and the 4 sequential arcs coincide, these must have width 15 (60/4), which cannot combaciar and with radius 7; assuming that it has the minimum useful radius, i.e. 7,5, the center would be hilly with the tips and measure 3 would be 7.5.
to have that repeat result the total body size must be 45.95 and broken
Thank you very much